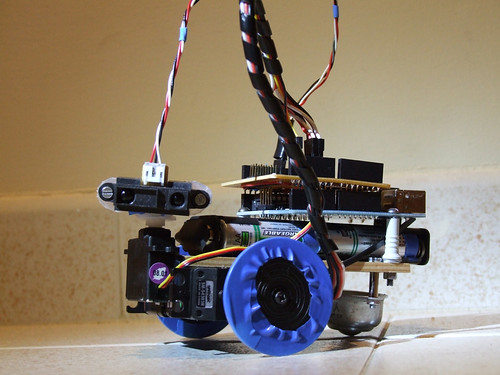
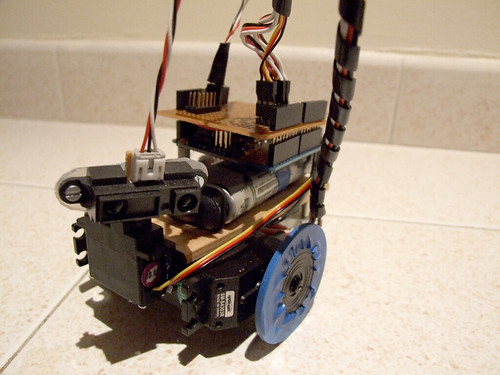
May I introduce you to the new family members: Farrusco v2.5, and Farrusco Junior.
Farrusco v2 is the new generation of my first robot Farrusco.
The F2 was created with Filipe Valpereiro from InMotion.pt, and this was the robot used for the last robotics workshops season.
The F2.5 version has a cleaner design, we are using two modified servos to work as DC motors as you can see in this tutorial, the motor driver is an ardumoto, and soon I will upload more photos with new addons.
Farrusco Junior is another iteration, he has two modified servos and a small chassis. The modified servos operate as normal servos but they rotate 360º continuously, and you can learn howto hack them watching this video tutorial (in portuguese).
This robot is still a work in progress, and I will upload new pics soon.
Prizes awarded to the top three Arduino projects. Projects will be judged by Shawn Augustson of ArduinoFun.com, Guilherme Martins of Guibot.net, Dr. Alison Colman of theFuseFactory.org, and we will also accept viewer submitted votes through Twitter
How to Enter: Contestants must create a project using the Arduino (any board). The project must be geared towards the beginner to intermediate user to help learn more about what the Arduino is and can do. Project can have already been submitted elsewhere, for example you already published it on another site like Instructables, etc.
Each project MUST HAVE the following in order to be considered:
Photo of the finished project
YouTube or other service video showing the project working
Step by step supporting documentation on how a user can complete your project
Arduino code used for project
List of sources used, for example if you borrowed ideas from another project on the web
(Optional) – Bonus points for adding a statement of what the Arduino has meant to you.
How to Submit Your Project: Send photos, documentation, links to your video and your arduino sketch pasted into a text file to shawn at arduinofun dot com. Projects will then be posted to ArduinoFun.com (you remain the project owner, we will not use projects in anything other than published to ArduinoFun.com)
This is my first experiment with the MakerBot. I am totally thrilled with this machine!!!
(photo by Tiago Serra)
SSS (servo suspension system) is designed to support standard servo motors and act as a basic suspension. It is still a work in progress and has not been tested yet.
Will update results as soon as possible (still waiting to have my lab back).
The stage, cenary, coreography and lyrics are Rui Horta’s work, for the video projections we are using an application coded by Rui Madeira. The immersive soundscapes and music belong to Tiago Cerqueira.
I’ve created visual environments, animations and textures to be projected on stage, in the photos below you can see samples of my work. “Video after the break”.
O Festival de Artes Digitais Olhares de Outono chega este ano à 10ª edição. Os workshops são gratuitos porém, os que têm como objecto a plataforma Arduino implicam a aquisição de kits de material que ficam para o formando. Os interessados podem solicitar mais informações ou realizar uma pré-inscrição através do mail hdias@porto.ucp.pt ou consultar o site: Olhares de Outono, 2009
Os temas dos workshops são:
/// COMUNICAÇÂO SEM FIOS COM O ARDUINO
\\\ TRACKING VIDEO
/// PURE DATA
\\\ ROBÓTICA CRIATIVA
COMUNICAÇÂO SEM FIOS COM O ARDUINO
18 de Nov. (9:30-12:30 e 14:00-17:00) | Duração: 1 dia
Participantes: 10 – 12 | Formador: Filipe Valpereiro
TRACKING VIDEO
19 de Nov. (14:00-18:00) e 20 de Nov. (9:30-12:30 e 14:00-18:00)
Duração: 2 dias | Participantes: 10 – 12 | Formador: Armando Menicacci
PURE DATA, introduction à Pure Data – design sonore.
23 e 24 de Nov. (9:30-12:30 e 14:00-16:00) | Duração: 2 dias
Participantes: 10 – 12 | Formador: Christian Delecluze
ROBÓTICA CRIATIVA
23, 24 e 25 de Nov. (9:30-12:30 e 14:00-17:00) | Duração: 3 dias
Participantes: 10 – 12 | Formador: Guilherme Martins e Filipe Valpereiro
I’m moving to an apartment near Lisbon, and this is one of the reasons for the long time no-posting and no-building robots.. and I still have to wait one more month to have my lab back! :D
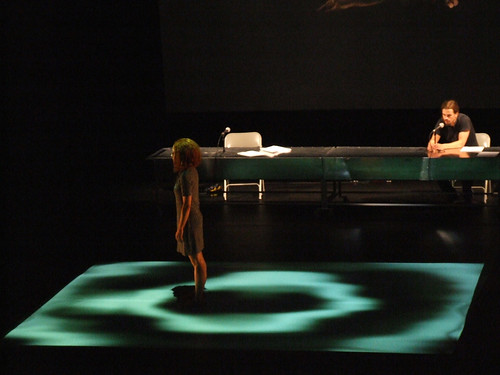
Talk Show é uma obra para quatro intérpretes e duas colunas de som. Um questionamento sobre o corpo enquanto sistema comunicante e sobre o seu desaparecimento ao longo da vida no território maior da sua evidência, o amor.
15 e 16 Out 2009 – 21:00
17 Out 2009 – 18:00 e 21:00
18 Out 2009 – 17:00
M/12 ANOS
PEQUENO AUDITÓRIO – SALA EDUARDO PRADO COELHO
Um homem e uma mulher falam um com o outro à frente de uma plateia. As suas linguagens são simultaneamente a voz e o corpo. Falam de tudo e sobretudo através dos seus corpos, depositários do tempo, testemunhas de uma longa viagem. O corpo é a nossa única propriedade. Tudo o que realizamos tem a sua medida, tanto no espaço como no tempo. Talk Show é um road movie do corpo. Uma viagem onde a memória se inscreve no decifrar do passado e no momento do ajuste de contas, face ao futuro. Um exercício de curiosidade e inquietude perante o desconhecido. Quando o corpo se apaga, o que resta?
Coreografia, Espaço cénico, Desenho de luz e Multimédia RUI HORTA
Música original TIAGO CERQUEIRA
Textos RUI HORTA | TIAGO RODRIGUES
Intérpretes ADRIANA QUEIROZ | MIGUEL MOREIRA | JOÃO MARTINS | BEATRIZ PEREIRA
Programação Multimédia RUI MADEIRA
Paisagem Visual GUILHERME MARTINS
Apoio dramatúrgico TIAGO RODRIGUES
I’ve been working on this for a while and finally I have the courage to post the results.
I’m also testing the pololu micro serial servo controller in the hope I could achieve better results. One good thing the pololu controller has, is the ability to set the speed of the movement, I guess it is a good plus to have this extra control. And using this feature together with the filter you get really cool and smooth movements, check the end of the video.
The point I don’t like in this experience is that the robot shakes a lot, but that is due to the weak support. I will have to arrange a solution to void so much shakiness.
The low pass filter below is what makes the desaceleration while the value reaches the destination point. I’ve posted the full code below the video.
filter: 0.05; // 1 = no filter // has to be between 0.01 and 1
destinationValue = 1000;
destinationValueFiltered = destinationValueFiltered * (1.0-filter) + destinationValue * filter;
Code to move one servo directly connected to the Arduino:
// easing servo movements with low pass filter// the servo signal must be connected directly to the arduino pin 2 // Time interval, this executes one piece of code from time to time// Download Metro lybrary and instructions:// http://www.arduino.cc/playground/Code/Metro
#include <Metro.h>
int duration = 3500; // duration of the interval in milisecondsMetro intervaller = Metro (duration);
// MegaServo library// download and instructions: // http://www.arduino.cc/playground/Code/MegaServo
#include
MegaServo servos;
// servos minimum and maximum position
#define MIN_POS 800 // the minuimum pulse width for your servos
#define MAX_POS 2200 // maximum pulse width for your servos// servo pin
#define s0_pin 2
// variables to hold new destination positionsint d0; // destination0int d0_sh; // destination0 to be smoothed// the filter to be aplied// this value will be multiplied by "d0" and added to "d0_sh"float filtro = 0.05; // 0.01 to 1.0// setup runs once, when the sketch startsvoidsetup() {
// initialize serial comunicationSerial.begin(9600);
// set servo pin
servos.attach(s0_pin);
}
// main program loop, executes forever after setup()voidloop() {
// check the time interval, if it reaches limit "duration" goes back to one // and runs the codeif (intervaller.check() == 1) {
// calculate a new random position between max and min values
d0 = random(MIN_POS, MAX_POS);
// resets interval with a new random duration
intervaller.interval(random(500,2000));
}
// smooth the destination value
d0_sh = d0_sh * (1.0-filtro) + d0 * filtro;
// assign new position to the servo
servos.write(d0_sh);
// delay to make the servo movedelay(25);
}
And this is the code to use with the pololu micro serial servo controller:
// easing servo movements with a low pass filter and Pololu Micro Serial Servo Controller// Time interval, this executes one piece of code from time to time// Download Metro lybrary and instructions:// http://www.arduino.cc/playground/Code/Metro
#include <Metro.h>
int duration = 3500; // duration of the interval in milisecondsMetro intervaller = Metro (duration);
// servos minimum and maximum position
#define MIN_POS 500 // the minuimum pulse width for your servos
#define MAX_POS 5500 // maximum pulse width for your servos// variables to hold new destination positionsint d0; // destination0int d0_sh; // destination0 to be smoothed// the filter to be aplied// this value will be multiplied by "d0" and added to "d0_sh"float filtro = 0.05; // 0.01 to 1.0// set servo speed, goes from 1 to 127int servoSpeed = 120;
// setup runs once, when the sketch startsvoidsetup() {
// initialize serial comunicationSerial.begin(9600);
// set servo pin and speed
servoSetSpeed(0, servoSpeed);
}
// main program loop, executes forever after setup()voidloop() {
// check the time interval, if it reaches limit "duration" goes back to one // and runs the codeif (intervaller.check() == 1) {
// calculate a new random position between max and min values
d0 = random(MIN_POS, MAX_POS);
// resets interval with a new random duration
intervaller.interval(random(500,3000));
}
// smooth the destination value
d0_sh = d0_sh * (1.0-filtro) + d0 * filtro;
// assign new position to the servo
put(0,d0_sh);
// delay to make the servo movedelay(25);
}
// functions from this forum topic:// http://forum.pololu.com/viewtopic.php?f=16&t=745&start=60&st=0&sk=t&sd=avoid put(int servo, int angle)
{
//servo is the servo number (typically 0-7)//angle is the absolute position from 500 to 5500unsignedchar buff[6];
unsignedint temp;
unsignedchar pos_hi,pos_low;
//Convert the angle data into two 7-bit bytes
temp=angle&0x1f80;
pos_hi=temp>>7;
pos_low=angle & 0x7f;
//Construct a Pololu Protocol command sentence
buff[0]=0x80; //start byte
buff[1]=0x01; //device id
buff[2]=0x04; //command number
buff[3]=servo; //servo number
buff[4]=pos_hi; //data1
buff[5]=pos_low; //data2//Send the command to the servo controllerfor(int i=0;i<6;i++){
Serial.print(buff[i],BYTE);
}
}
void servoSetSpeed(int servo, intspeed){
//servo is the servo number (typically 0-7)//speed is servo speed (1=fastest, 127=slowest)//set speed to zero to turn off speed limitingunsignedchar buff[5];
unsignedchar speedcmd;
speedcmd=speed&0x7f;//take only lower 7 bits of speed
buff[0]=0x80;//start byte
buff[1]=0x01;//device id
buff[2]=0x01;//command number
buff[3]=servo;//servo number
buff[4]=speed;//data1for(int i=0;i<5;i++){
Serial.print(buff[i],BYTE);
}
}