Processing House Visualizer

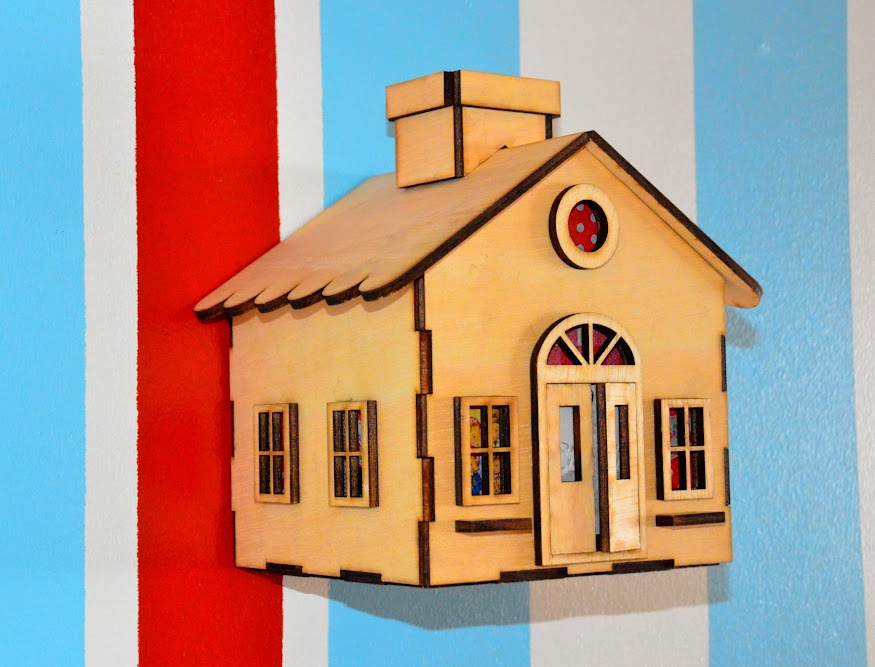
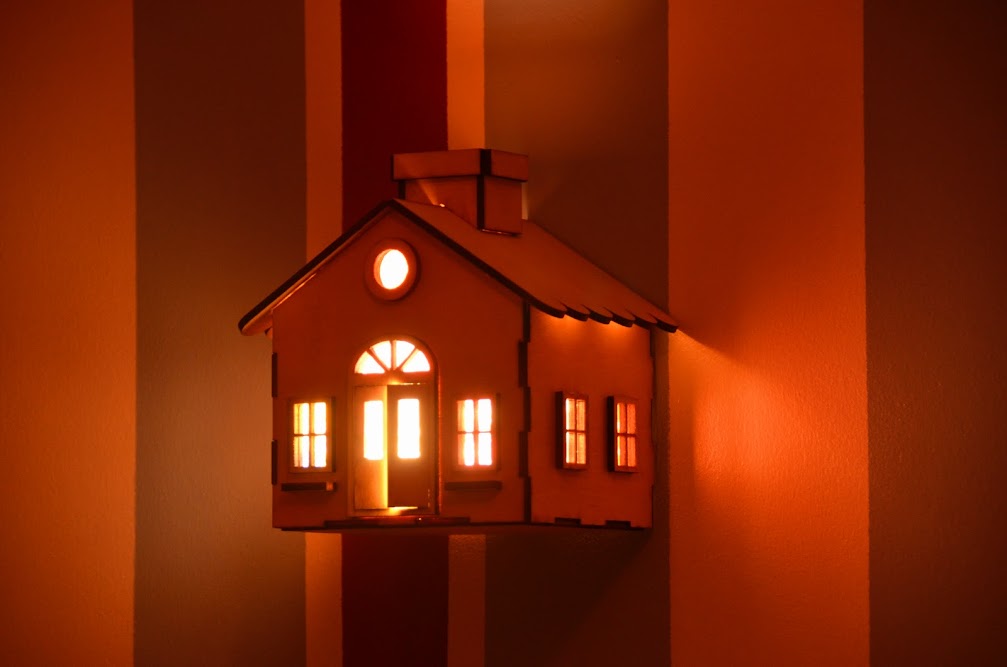
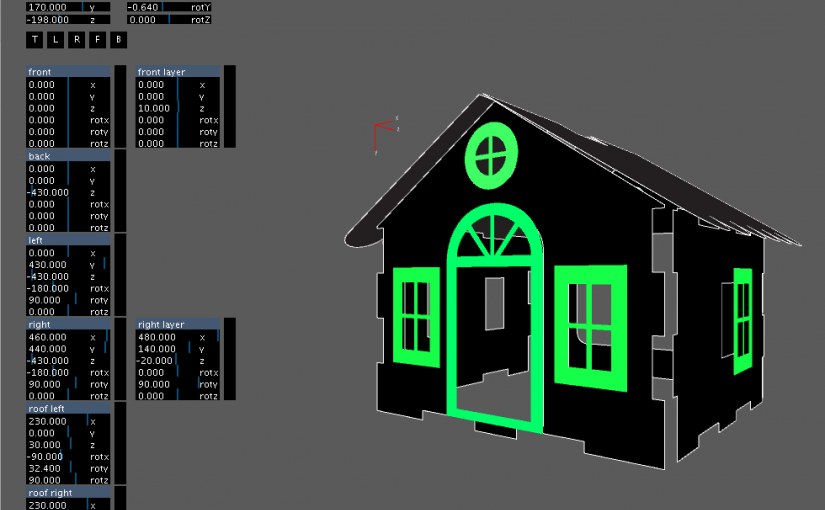
During this holidays week we had the idea of creating a lamp, but a different lamp. We want it to have the shape of a little house, so we thought in going to a FabLab to cut some shapes in order to create a house. Because I used a 2D vectorial program I needed to visualize the shapes to be sure that the snaps would feat together, so I invented the challenge of building a custom visualizer, with the possibility to load SVG’s, adjust and rotate them in xyz.

Nothing better than Processing for the task.

Processing House Visualizer

The SVG’s are loaded and displayed on a 3D space, with the help of the sliders it is possible to position each one of the shapes and record a preset in CSV format.

This was a two day work and because I didn’t wan’t to spend the rest of the holidays coding, I left some features that I will add at another time (or maybe not). This is what I would like to add:

  • add a left overlay layer
  • possibility to change colors
  • possibility to extrude SVGs
  • add a chimney
  • make it playable on the browser

The code is available on GitHub

Meanwhile the shapes seemed to be good to go. It was our first time in FabLab Lisboa and it was a great experience. Using the laser cutter was something new to me and I am thinking in more future stuff to build.

The final result was just great, you can see more in A Rosa Cor de Rosa ‘s blog.

bigbro upgrade

This time I added the Solarbotics L298 Compact Driver Kit, the car is now much more powerfull and it is very cool to drive.

In the photo you can see a proto shield where I connected the Xbee, the motor and servo and the LEDS, than the L298N board and a 6v voltage regulator.

I added a small video with some “stunts”  :)

(I´m using the G-Remote to drive this beast!)  :D

Click here to see more cool stuff:

Continue reading bigbro upgrade

Ratazana drifting

I´ve been quite busy with the motor of this robot and I already started to have some of the results I wanted, but I still couldn´t find a stable setup, after a couple of drifts it starts to lose power as you can see by the end of the movie.

Besides this, I like the way it moves, and I can have some control when it´s drifting, it is now my anti-stress toy!!! :)

I have also made some major updates to the arduino circuit board. As you can see in the photo below, I finally have figured out how to upload code to a custom arduino board, (this post describes everything related to this), added capacitors to the L293D, added pins for the ladyada xbee adapter and also added pins for the sonar sensor.
To upload code, I have to add a switch button, to change the rx / tx wires from the xbee to the ftdi cable :)

Continue reading Ratazana drifting

Robotic articulation prototype with Arduino

This is the result of a couple of tests with recently arrived microservos + Arduino programming + polymorph shaping technics + recently build G’Remote :-)

I don´t have any specific application in mind for this, the main purpose is to learn and test new concepts of mechatronic articulations, and to get used to polymoprh of what I became a big fan.

(sorry for the low light condition video, will make a better one)

G’Remote – Arduino based remote controller

27-August-2009 UPDATE:
My friend Gerhard from Germany asked me to build a walkthrough regarding the G-Remote, with part list, schematics and code. And here it is.  Enjoy  :D

___________________________________________________________________________

This is my first attempt to make a custom remote controller, and also my first customized Arduino.
After seeing this post made by OddBot I wanted to try to make one myself.

I figured out that if I purchased one remote controller it would be cheaper than buying two of these and paying shipment to Portugal.

So, ripping the guts from a game remote controller I get two joysticks, a couple of buttons, two nice motors and one small lcd.

Each joystick have one button inside, that is cool  :-)

Now I have more control over my bots, specially the ones with two motors.. will post videos later.

no comments on this one :-)

BreadUino

This came up with the need of having the arduino permanently installed on the robots, I´m tired of having to remove the arduino from one bot to the other, and then rewire everything, and then reupload the code everytime I have a new idea, or everytime I want to show the bot to someone.

So I followed the ITP Physical Computing tutorial, and it works like a charm, now I want to try to upload code with the FTDI cable, and If I have success on this I can start making my custom Arduino boards. :D

The link below might be of interest:

Burning the bootloader without an external AVR-Writer

=================================================================

Update: 18.03.09

And here´s the trick to upload code without having to remove the chip to a normal Arduino board, and then put it back on the breadboard, I´m using an FTDI cable, Black and Red connect to GND and +V, he RX from the FTDI cable goes to the AVR’s TX (pin3) and the FTDI’s TX goes to AVR’s RX (pin2).

“I hold down the reset button, press the upload button, count to three, then release the reset button. Then the IDE seems to upload the smoothest.” Full credits to Rudolph for sharing the trick.

Another mighty trick is using a 0.01 uf cap between the RTS (green wire) and reset pin, it will make an auto reset before uploading!!! I´ve made my day!! :D    Thank you Rory  ;)

=================================================================

Testing the circuit with the L293D :-)