I couldn’t let this pass by without announcing it here, it’s just a simple tool to interface Max with Arduino back and forth.

I couldn’t let this pass by without announcing it here, it’s just a simple tool to interface Max with Arduino back and forth.
This project was made on a rainy weekend, I was showing Trackmania to my 5 years boy and while he was trying to play the game, he was actually struggling with the keys, so I had the idea of hacking an old remote control of a broken toy.
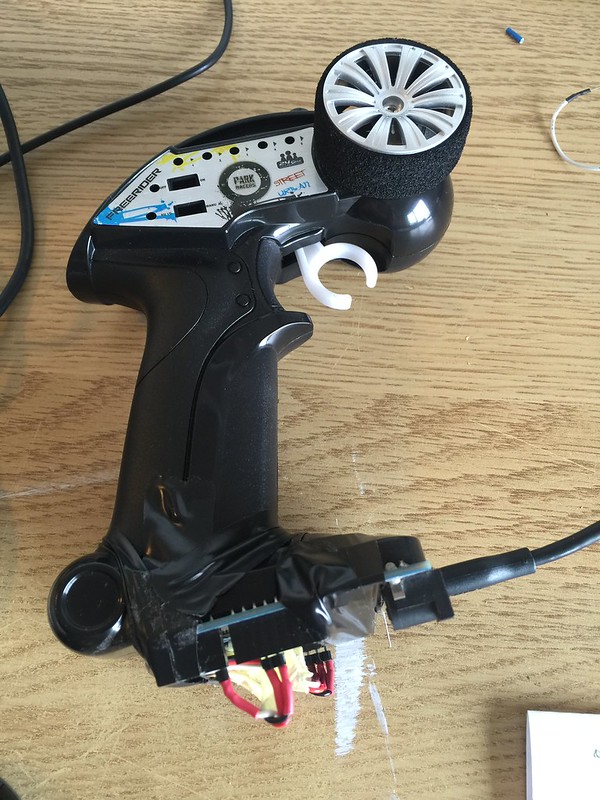
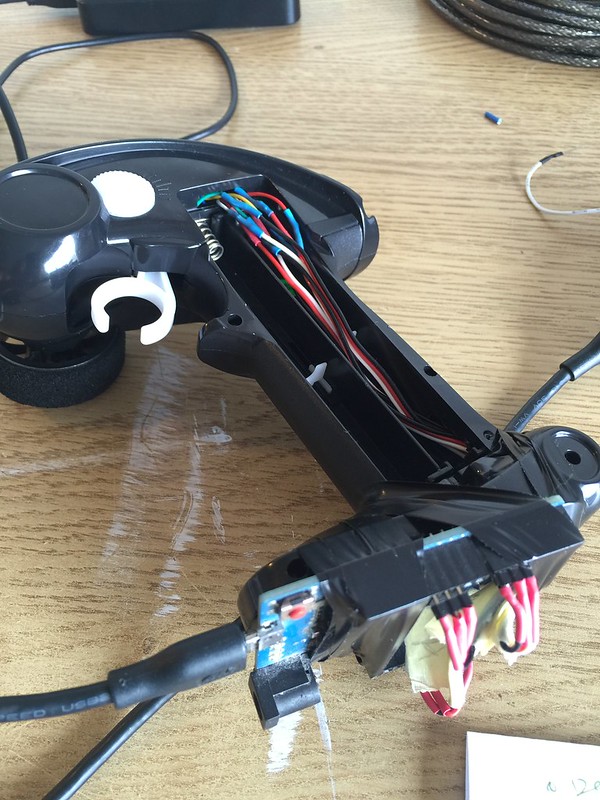
Just hooked an Arduino Leonardo to the steering wheel and throttle sticks and assigned key strokes for TrackMania. For the ones who don’t know trackmania, its a free racing game and very cool to play with, I should say very addictive too!
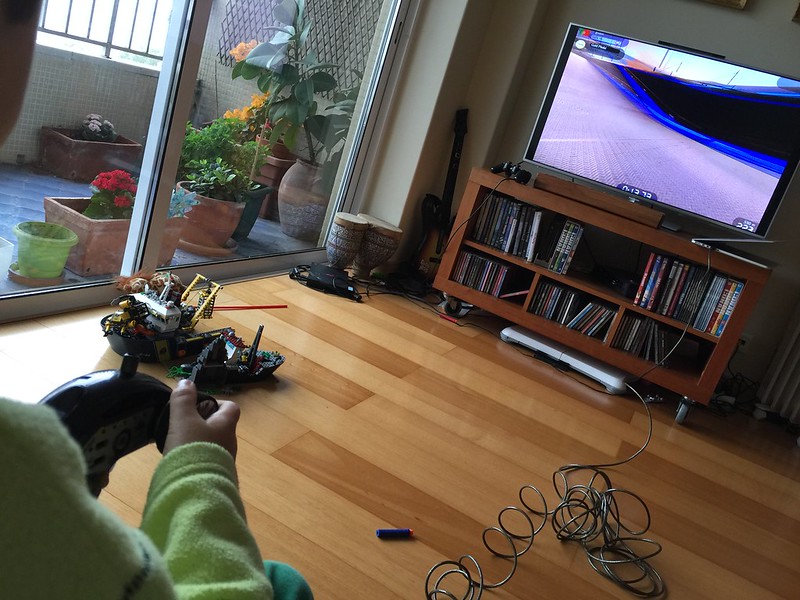
Loads of fun of course!! :D
Magabot is an open hardware and software robotics platform designed to stimulate creative minds.
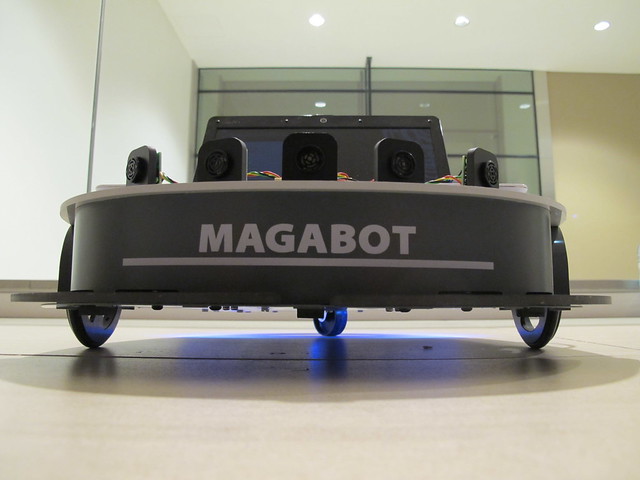
Any robot with a computer is a very powerfull robot, and because all laptops have a camera, a screen, speakers, microphone, batteries and usb interfaces, your robotics experience will be empowered with Magabot.
This project is being developed in a partnership with IDMind, Artica and with the participation of Francisco Dias.
The Software:
Many applications are being developed right now, follow colors, wall follower, face detection, among many others.
We will provide interfaces for VisualStudio, .NET, c#, c++, openFrameWorks, Processing, Arduino, Flash, Unity3D, MAXMSP, PD and if you feel like you want to develop your own interface you will be welcome too, we give full credits on everything.
You will be able to download apps for the Magabot, to develop your own apps, and if you feel they deserve money, you will be able to sell them too.
The hardware:
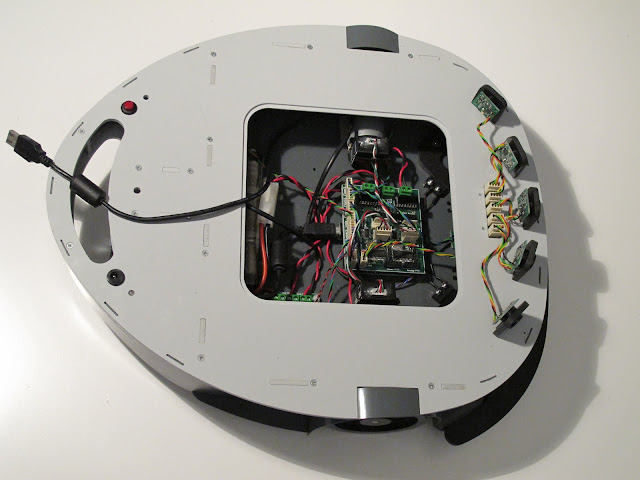
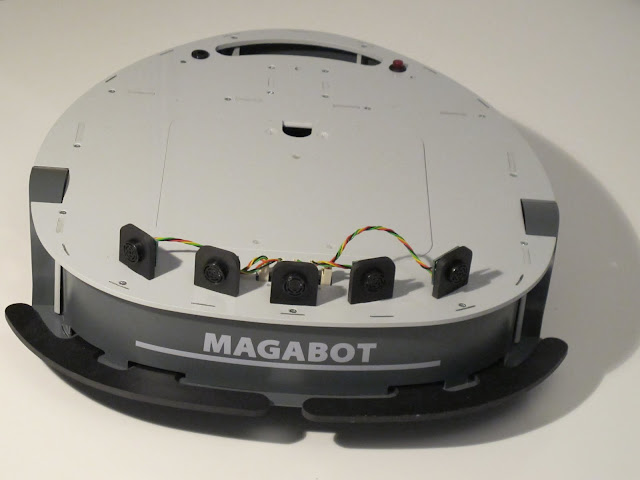
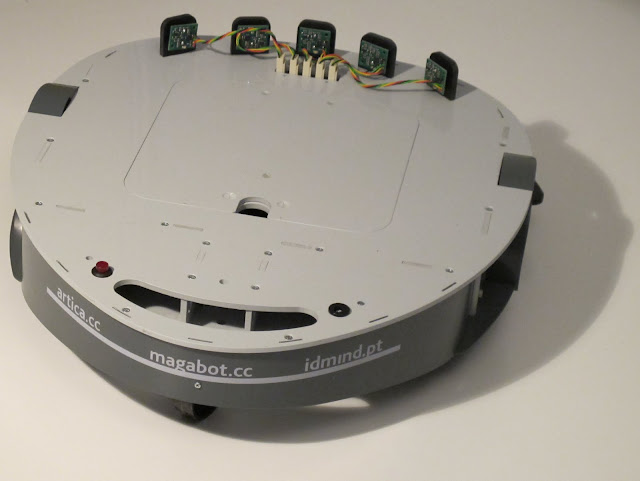
The hardware is made with rigid PVC and a differential drive chassis with highly precise encoders on both motors at the commands of an Arduino and a customized shield. You’re completely invited to change and adapt it to your needs.
The basic setup integrates:
– PVC chassis with DC motors with encoders;
– Three Infrared-sensors on the bottom to detect stairs or lines;
– Two bumpers on the front to detect collisions;
– Three RGB leds if you are in the mood for some tuning;
– A battery sensor to know how if it is in the need for some juice;
– I2C bus on top to connect any I2C devices;
– A 7.2v battery and a charger.
Add-ons built at the moment:
– Pack of 5 Maxbotix sonar sensors with PVC supports to connect to the upper I2C BUS;
– Other add-ons are beeing developet at the moment.
– – – – – – – – – – – – – – – – – – – – – – – – – – – – – – – – – – – – – – – – – – – – – – – – – – – – – – – – – – – – – – – –
We lauched the magabot.cc site today, this website will be a repository for informatiom, source code, apps, hacks, support forum, and a place to buy Magabots.
– – – – – – – – – – – – – – – – – – – – – – – – – – – – – – – – – – – – – – – – – – – – – – – – – – – – – – – – – – – – – – – –
Magabot is a protoproduct, we are commercializing our open source and open hardware best prototype at a low cost:

If you buy one you will automatically enter on our beta test program, we invite you to share your experiences and to post your results, we will also provide you with support for you to be able to use it, change it, and play with it.
The current price for the platform wthout the sonar kit is 250€ plus VAT.
The current price for the sonars kit is 100€ plus VAT.
If you need more information please contact us: info [at] magabot [dot] cc
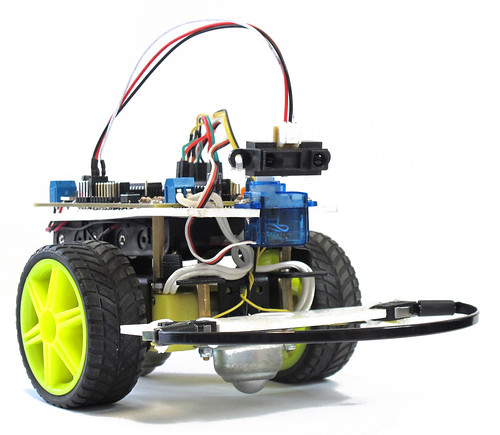
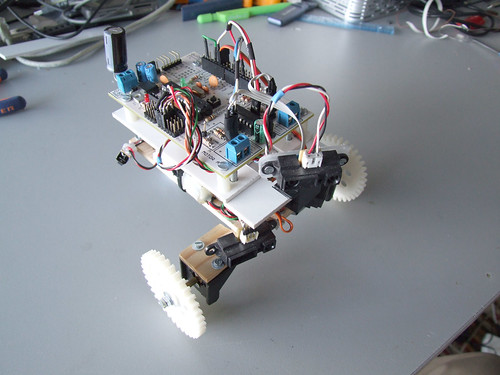
Farrusco is a small robot based on the Arduino platform, in this case, is using a Motoruino wich is inspired on the Arduino but with a couple of enhancements – dc motor dual controller, servo and sensor plugs.
With Farrusco you will be able to make it avoid obstacles, follow walls, enter in free space mode, and in the future more add-ons will be available, just to name a few: line follower, speakers and light sensors, RGB leds, and so on.
This robot is intended to:
– enthusiasts wishing to enter in the creative computing and robotics fields but don’t know where to start;
– engineering and physical computing students who need a development platform;
– digital artists and designers;
– students of all grades;
– be a simple toy.
More information @ guibot.pt/farrusco
This time “txapuzas” presented us with 3 new derivations of the Paperduino, one on a perfboard, other on a pcb, and another on a stripboard pcb. I totally love them all, specially the pcb version ready to be etched.
All versions are very well documented and I totally want to try them all.
Paperduino on a perfurated board:


Paperduino on a stripboard pcb:


And finally on an etched pcb (my favourite):


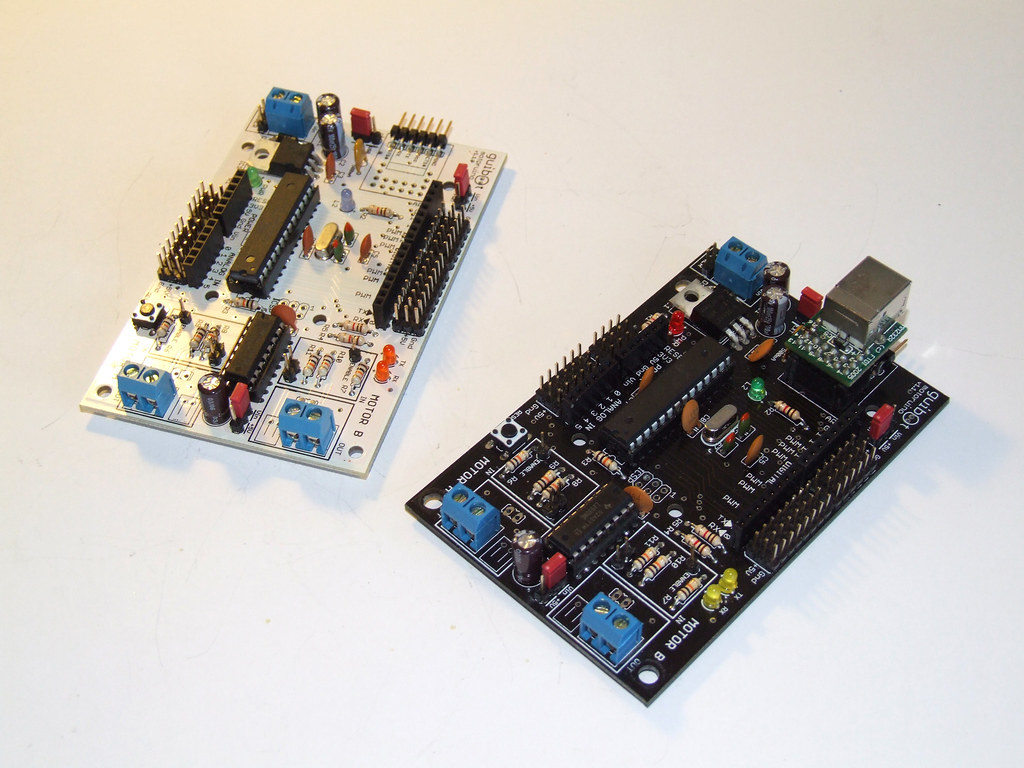
It’s a pleasure to present the new release of the Motoruino boards!
Kits will be available in June ‘ 2010, visit http://guibot.pt to read more information about the boards, prices and distributors.


The motoruino is so easy to setup, just plug the motors, sensors, upload code and your bot is ready to go.
I added a big capacitor (4700uF) on the PCB power connections as I had the Motoruino resetting randomly when a motor started (OddBot explains everything here)

This is a quick test drive with the demannu (unnamed bot).
Motoruino page: www.guibot.pt/motoruino
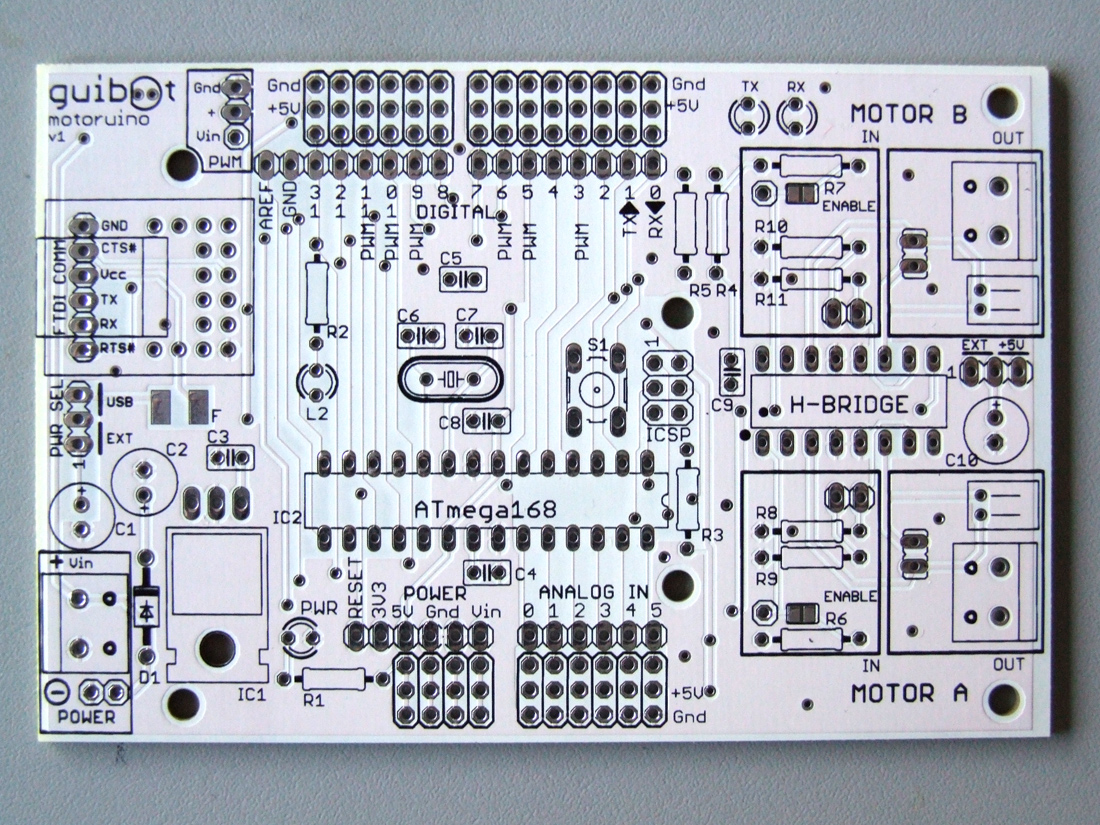
It´s since I started with robotics, that I felt the need of having a board where I could directly plug-in my motors, servos, sensors and all the stuff without having to purchase extra shields, or building pcb’s and soldering and troubleshooting and hours and hours of hard labour.. so, I decided to start designing a new Arduino board. When I mention design, I didn’t actualy design the board in cad software, this amazing task was accomplished by my friend David Palma.
We talked a lot about usability, electronics and how to introduce robotics to newbies, and this is the first batch we ordered. We are working on a new batch with more layout improvements.
Main key words:
– easy to use, understand, play with;
– must be a plug-and-roll board;
– to be suitable with shields, and with regular Arduino Diecimilla/Duemillanove boards;
– the usage of the H-Bridge is open, i.e., there aren’t any Arduino output pins assigned, the user can use the bridge the way he/she wants;
– motors supply and PWM pins might be used with external voltage or regulated 5 volts
– motors have 3 different connectors, screws terminals, male headers, JST connectors
– two possible FTDI/USB connections available:
1. USB / TTL convertor, there are some choices on the market for this one, you can have it in the form of a cable, or in the form of a small pcb
2. USB adaptor with the FTDI chip embedded
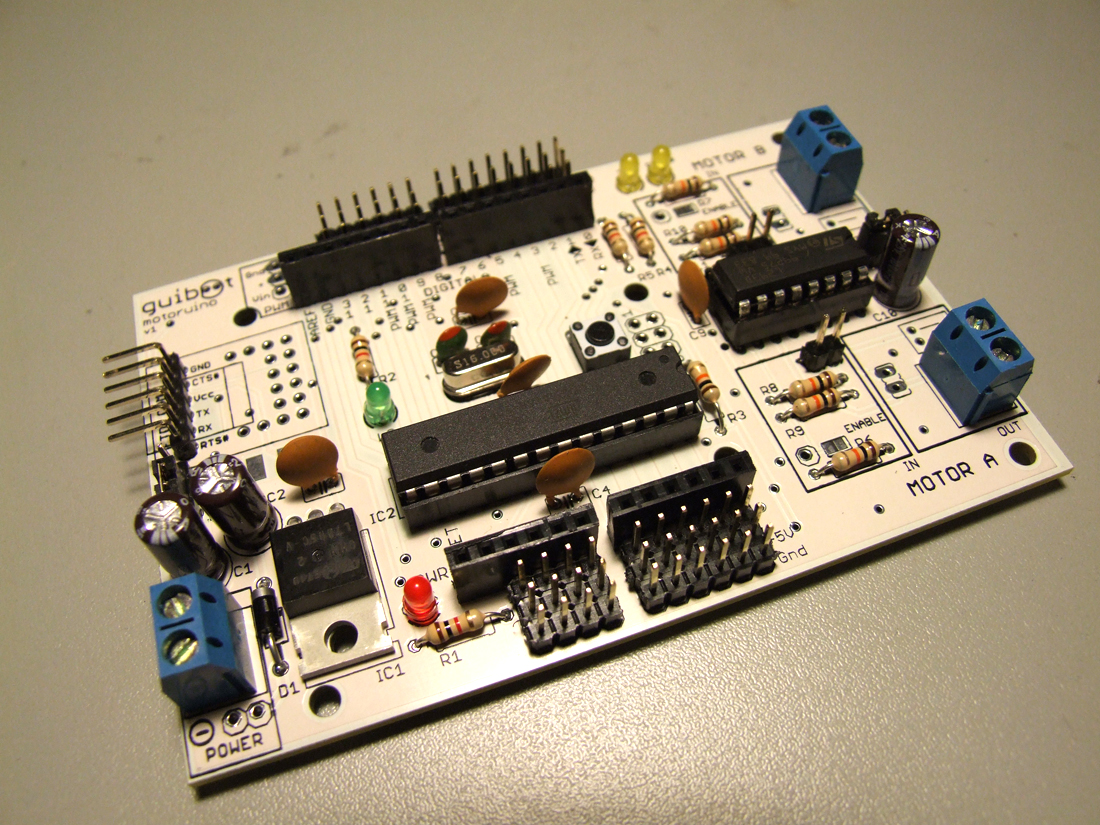
The board fully assembled is pretty neat and clean.

Next batch will be in black :)
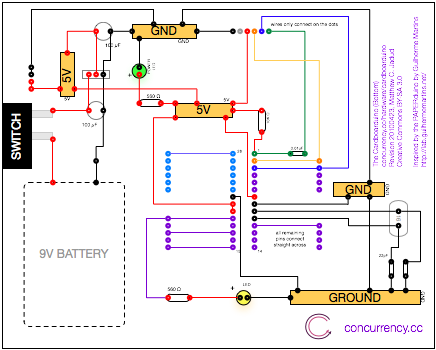
Everytime I see PAPERduino’s being featured in blogs, websites, and other people projects I feel joy! This time I have the surprise of looking at the Concurrency website, the new multithread language for Arduino, and I see the PAPERduino giving this guys the ideia of taking it to a higher level, I present you the Cardboarduino: “The Cardboarduino is physically larger than the PAPERduino, and includes space for a 9V battery clip.”
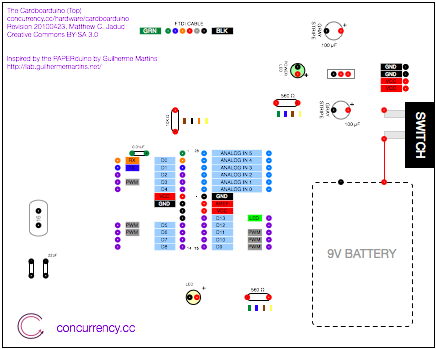
The bottom shows all of the pins that need to be soldered together with wire.