After long research and trial and error, I´ve came up to a new walkthrough regarding this nice chip, the L293D.
Each project is one project and each one has its own unique power configurations, so you must be aware of the best battery choice and how to distribute voltage through your robot.
I strongly advice you to read the following articles:
Picking Batteries for your Robot
Once you’ve decided on batteries, how do you regulate the voltage
************************************************
L293D gives you the possibility to control two motors in both directions – datasheet
************************************************
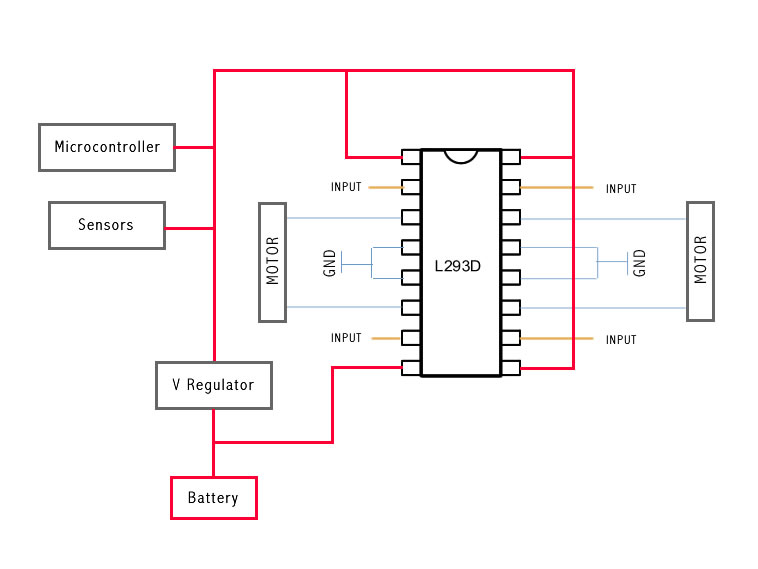
The L293D Circuit:
Basic Implementation:
This is the most basic implementation of the chip.
As you can see, a 5V Voltage Regulator is between the battery and pins 1, 9, 16.
Pin 8 gets power before the VReg, if your motor needs for example 6V you should put 6V directly in this pin, all the other pins should not get more than 5V.
This will work with no problem at all, but if you want to do the right implementation take a look at the next example:

This is the correct Implementation (with the capacitors), and note that pin 8 is feeded by unregulated voltage. This means that if your motors need more than 5V, you should power this pin with that amount of voltage, and the rest of the circuit with 5V.
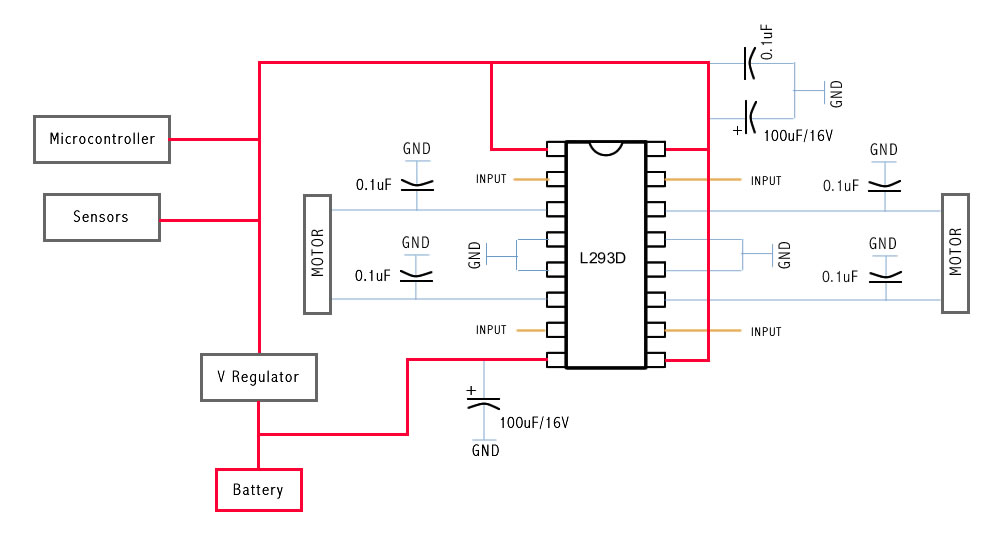
The capacitors stabilize the current.
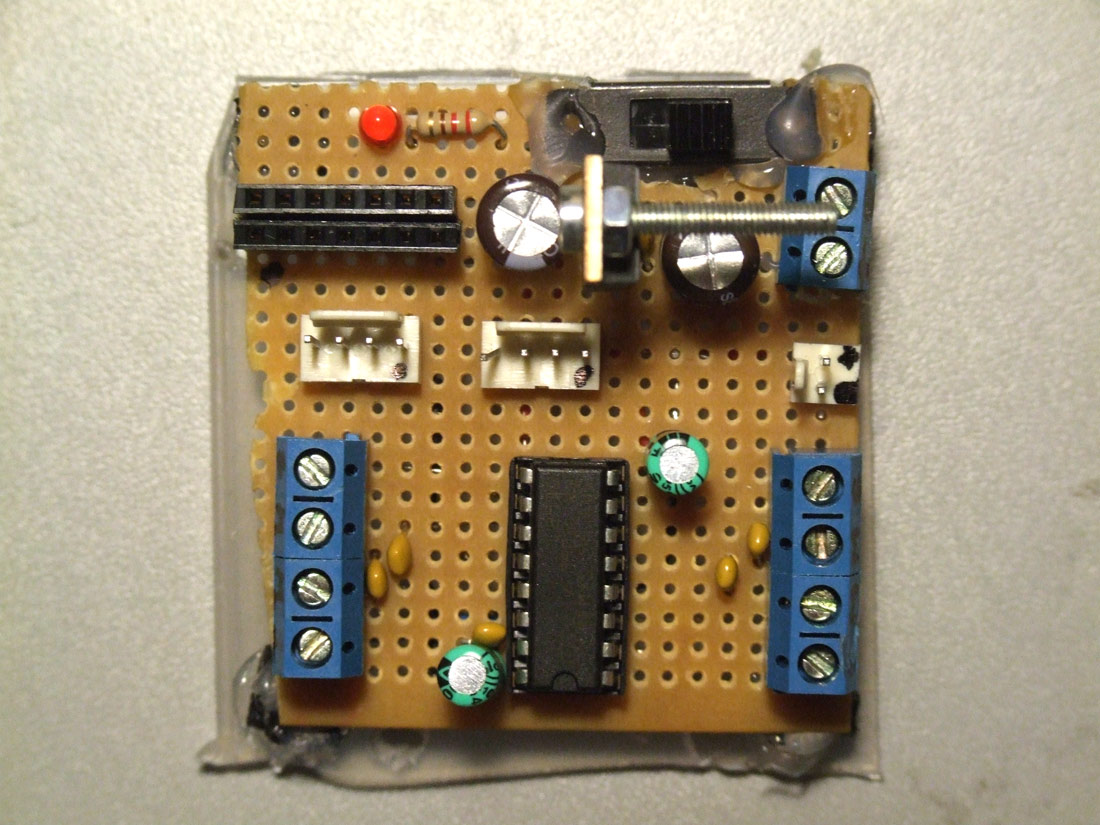
The same circuit on a breadboard:

Soldered on a pcb and ready to go:

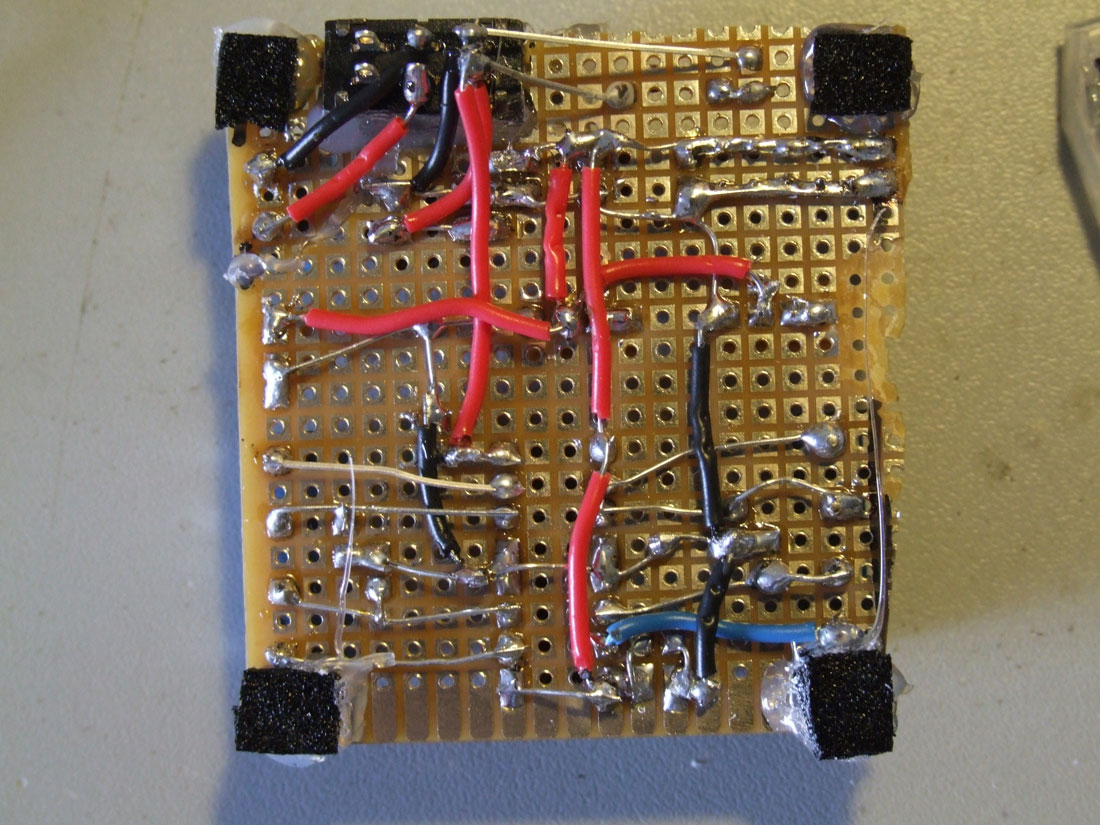
This is the back of the circuit, click for high resolution photo.
// Use this code to test your motor with the Arduino board:

// if you need PWM, just use the PWM outputs on the Arduino
// and instead of digitalWrite, you should use the analogWrite command

// —————————————————————————  Motors
int motor_left[] = {2, 3};
int motor_right[] = {7, 8};

// ————————————————————————— Setup
void setup() {
Serial.begin(9600);

// Setup motors
int i;
for(i = 0; i < 2; i++){
pinMode(motor_left[i], OUTPUT);
pinMode(motor_right[i], OUTPUT);
}

}

// ————————————————————————— Loop
void loop() {

drive_forward();
delay(1000);
motor_stop();
Serial.println(”1");

drive_backward();
delay(1000);
motor_stop();
Serial.println(”2");

turn_left();
delay(1000);
motor_stop();
Serial.println(”3");

turn_right();
delay(1000);
motor_stop();
Serial.println(”4");

motor_stop();
delay(1000);
motor_stop();
Serial.println(”5?);
}

// ————————————————————————— Drive

void motor_stop(){
digitalWrite(motor_left[0], LOW);
digitalWrite(motor_left[1], LOW);

digitalWrite(motor_right[0], LOW);
digitalWrite(motor_right[1], LOW);
delay(25);
}

void drive_forward(){
digitalWrite(motor_left[0], HIGH);
digitalWrite(motor_left[1], LOW);

digitalWrite(motor_right[0], HIGH);
digitalWrite(motor_right[1], LOW);
}

void drive_backward(){
digitalWrite(motor_left[0], LOW);
digitalWrite(motor_left[1], HIGH);

digitalWrite(motor_right[0], LOW);
digitalWrite(motor_right[1], HIGH);
}

void turn_left(){
digitalWrite(motor_left[0], LOW);
digitalWrite(motor_left[1], HIGH);

digitalWrite(motor_right[0], HIGH);
digitalWrite(motor_right[1], LOW);
}

void turn_right(){
digitalWrite(motor_left[0], HIGH);
digitalWrite(motor_left[1], LOW);

digitalWrite(motor_right[0], LOW);
digitalWrite(motor_right[1], HIGH);
}
***********************************************************************************************
update 26/4/09
***********************************************************************************************
My 1st instructable :)
Control your motors with L293D and Arduino – More DIY How To Projects
Hi!!
Rely nice job…
I’m having some difficulties. So you can post the back of the assembled circuit.
Thanks a lot
Sure.. please wait until tomorrow ;)
Hi, there´s the photo, I hope it helps.
Good luck
Aquele parafuso no transístor é para efeitos de dissipação de energia certo?
é sim :)
Utilizas-te apenas um capacitador no regulador de voltagem??
Quais é que são as diferenças entre o ic L293d e o L293NE?
O regulador de voltagem tem 2 condensadores de 470uf cada, como podes ver na fotogradia está um de cada lado.
Desconheço as diferenças entre a L293D e L293NE, consulta as datasheets.
desculpa 1 condensador de 0,1uf
ele está lá, mas está por baixo do parafuso por isso não se vê
eu sei que ele está lá vesse, mas no outro guia para o qual tu tens o link no inicio da pagina está o esquema com 2 condensadores de 0.1uf e tu só utilizas um. Não é preciso o segundo? Era isso que eu queria saber
estão lá os dois, e um deles está de baixo do parafuso por isso não se vê :)
I saw the link to the letsmakerobot’s web site about power regulators, but could you show a breadboard or schematic picture of what you used as a power regulator? I’m having a tricky time picturing it from your complete PCB pictures. Thank you.
Hi!
Take a look into these tutorial: http://itp.nyu.edu/physcomp/Tutorials/ArduinoBreadboard
Check the first five photos, the power regulator circuit is very well explained ;)
Hi there. Thanks for the wonderful instructable. I do have a question though.
I understand from your instructable that L293D is controlled by MCU inputs.
Is it necessary L293D and the MCU to share the same power source?? for example common ground.
This is urgent. hope to hear from you guys soon.
thanks.
Hi.. I would just like to ask, what is the purpose of the capacitors? Thanks for your answers in advance!
Ups… Sry… I didn’t see..
____
The capacitors stabilize the current.
sr. Guilherme eu sou muito novo nestas andanças e queria ajuda .
no compilador do Arduino o codigo “void turn_right() {, da-me erro o que se passa?
não vou matar mais a cabeça, por isso pesso ajuda .
OBRIGADO
can we used the L293D without using MCU?tnx
hi, i like your code at most… but i can’t understand.. why you don’t use transistor between input1 and input2 to enable motor…?
hi! i am a student and i have a project just like this one. i have difficulties in analyzing how i can make connections for the servo motor in the l293d ic.. can you help me? can you give me a schematic diagram of the board you constructed w/ the servo motor connections? thanks!
there are no transistors in this circuit…
hi, the servo motor is directly connected to the arduino digital pin, the l293d is there to control two dc motors
so does that mean i can control the forward,reverse and stop of the servo motor (i am currently working on a unicycle robot) directly to the arduino? can you guide me with the program? thank you very much
I think you are misunderstanding two different things, one thing is a servo-motor, other thing is a dc motor
servo motor has limited rotation, normally goes from 0º to 180º
dc motor is a continuos rotation motor and to control it you need some kind of controller, in this post I am showing how to control it with an L293D

I believe you are trying to connecting a dc motor to the L293D, I don’t have any schematic available at the moment but you can find many googling a bit
hi,i’m using that ic in simple implementation.. just for control a simple 5V dc motor.
what is the difference between the “simple” implementation and the “advanced” implementation with capacitors?
does the capacitors prevent any current peak or something else?
thanks!
hi! yes capacitors mainly are used to prevent voltage peaks, if your application is simple you can start by not using them, if you see that your system is being affected by voltage peaks or electronic noise you should add the capacitors. good luck!
Ok ..
I’ll use them to make my project more “stable”.
Thanks.
hey i am trying to connect one servo and one dc motor, using a 293d board. but i was able to drive one the dc motor, not the servo. can you suggest the connections for the servo motor.
the L293D only drives DC motors, if you need to actuate on a servo you will need a microcontroller