I´ve added two ultra sound sensors and now I´m trying to make this bot a wall racer. Due to its drifting capabilities it’s being very hard to code this, but I will find a way to do that.
I´ve replaced the 4 AA batteries by a small 7.2V battery and now he has more power which also means more nerves.. :D
…
So, after a couple of hours of trying and trying, I quitted, and decided to relax and enjoy some drifts..
After long research and trial and error, I´ve came up to a new walkthrough regarding this nice chip, the L293D.
Each project is one project and each one has its own unique power configurations, so you must be aware of the best battery choice and how to distribute voltage through your robot.
I strongly advice you to read the following articles:
L293D gives you the possibility to control two motors in both directions – datasheet
************************************************
The L293D Circuit:
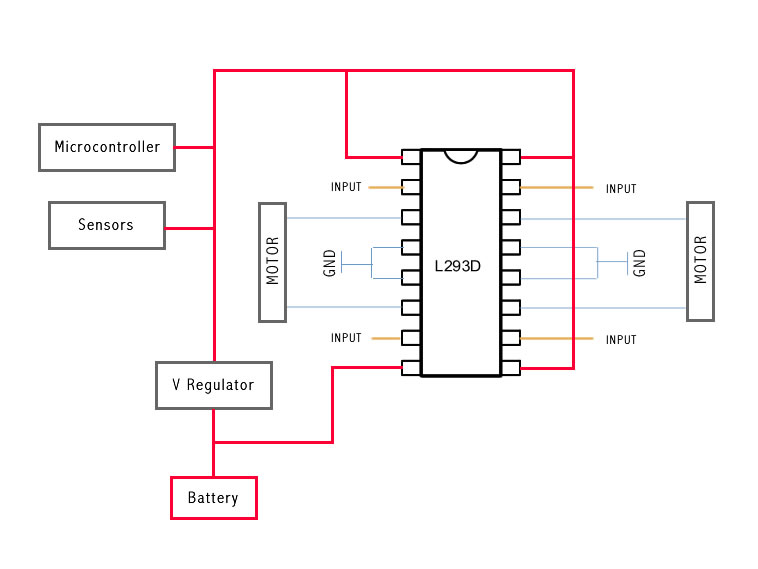
Basic Implementation:
This is the most basic implementation of the chip.
As you can see, a 5V Voltage Regulator is between the battery and pins 1, 9, 16.
Pin 8 gets power before the VReg, if your motor needs for example 6V you should put 6V directly in this pin, all the other pins should not get more than 5V.
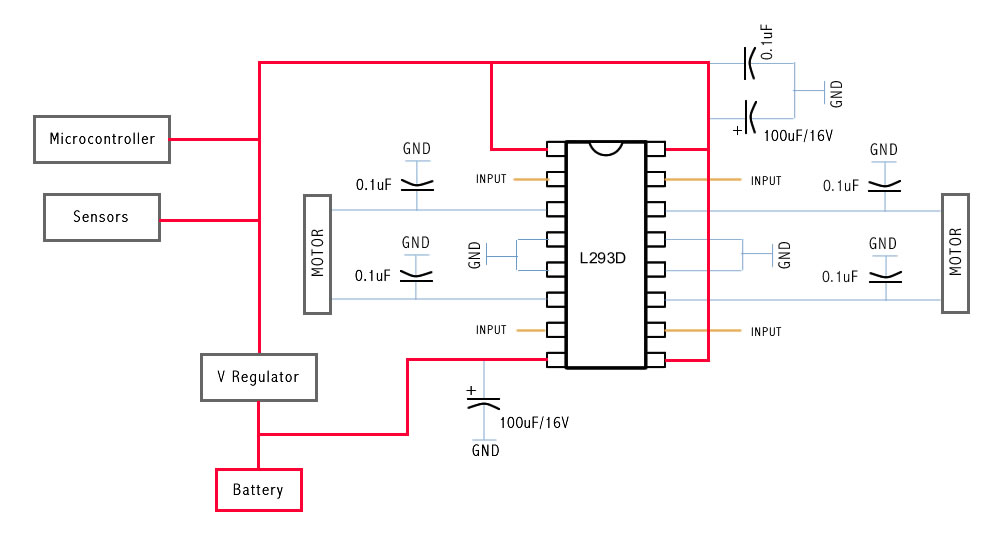
This will work with no problem at all, but if you want to do the right implementation take a look at the next example:
This is the correct Implementation (with the capacitors), and note that pin 8 is feeded by unregulated voltage. This means that if your motors need more than 5V, you should power this pin with that amount of voltage, and the rest of the circuit with 5V.
The capacitors stabilize the current.
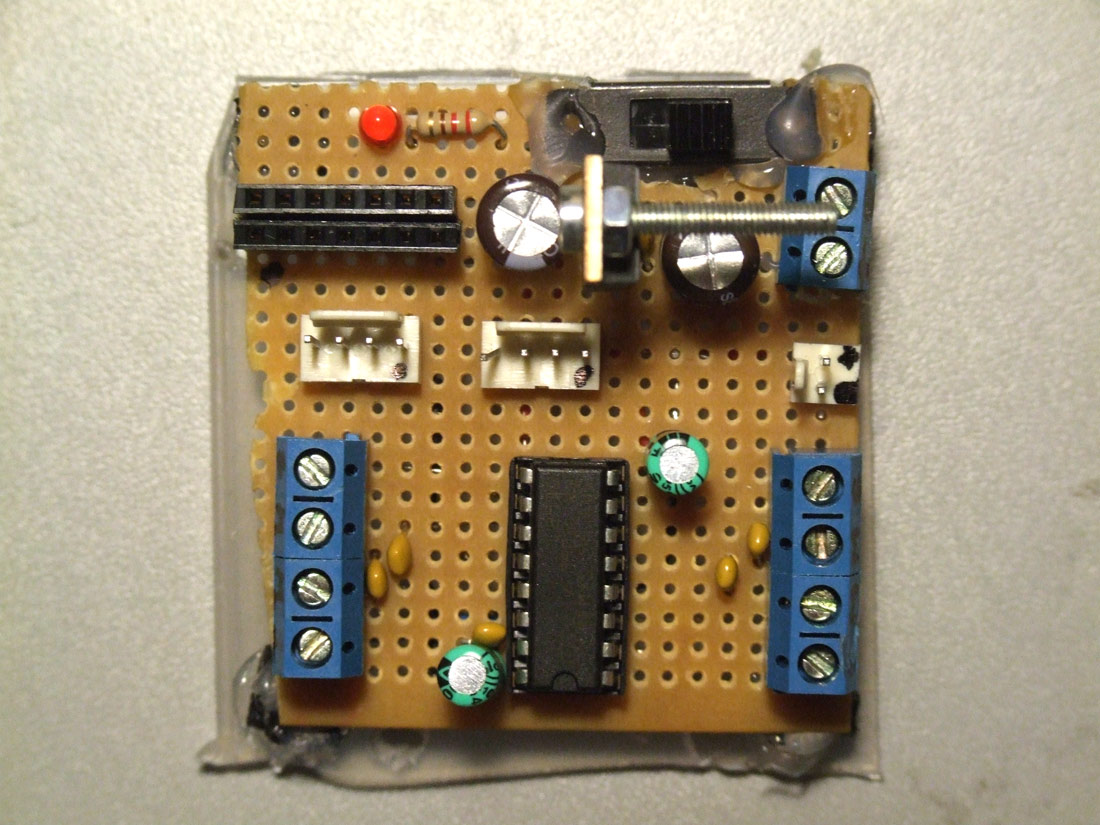
The same circuit on a breadboard:
Soldered on a pcb and ready to go:
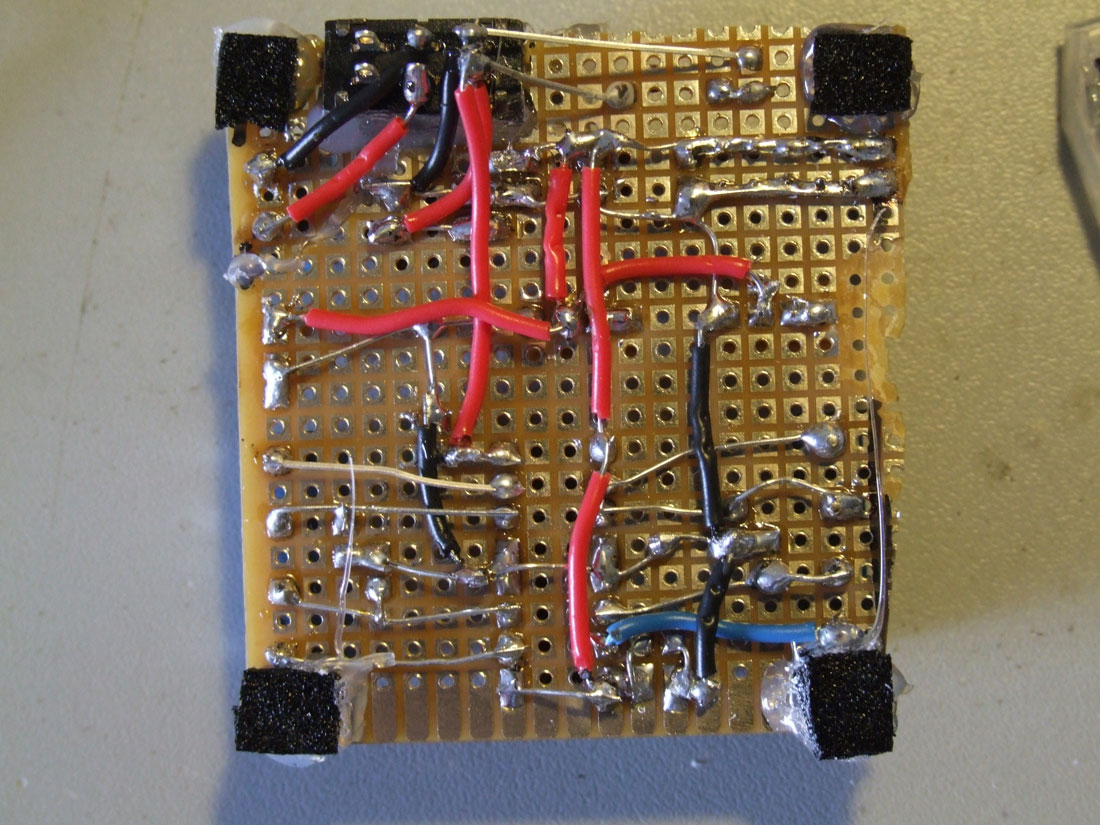
This is the back of the circuit, click for high resolution photo.
// Use this code to test your motor with the Arduino board:// if you need PWM, just use the PWM outputs on the Arduino// and instead of digitalWrite, you should use the analogWrite command// ————————————————————————— Motorsint motor_left[] = {2, 3};
int motor_right[] = {7, 8};
// ————————————————————————— Setupvoidsetup() {
Serial.begin(9600);
// Setup motorsint i;
for(i = 0; i < 2; i++){
pinMode(motor_left[i], OUTPUT);
pinMode(motor_right[i], OUTPUT);
}
}
// ————————————————————————— Loopvoidloop() {
drive_forward();
delay(1000);
motor_stop();
Serial.println(”1");
drive_backward();
delay(1000);
motor_stop();
Serial.println(”2");
turn_left();
delay(1000);
motor_stop();
Serial.println(”3");
turn_right();
delay(1000);
motor_stop();
Serial.println(”4");
motor_stop();
delay(1000);
motor_stop();
Serial.println(”5?);
}
// ————————————————————————— Drivevoid motor_stop(){
digitalWrite(motor_left[0], LOW);
digitalWrite(motor_left[1], LOW);
digitalWrite(motor_right[0], LOW);
digitalWrite(motor_right[1], LOW);
delay(25);
}
void drive_forward(){
digitalWrite(motor_left[0], HIGH);
digitalWrite(motor_left[1], LOW);
digitalWrite(motor_right[0], HIGH);
digitalWrite(motor_right[1], LOW);
}
void drive_backward(){
digitalWrite(motor_left[0], LOW);
digitalWrite(motor_left[1], HIGH);
digitalWrite(motor_right[0], LOW);
digitalWrite(motor_right[1], HIGH);
}
void turn_left(){
digitalWrite(motor_left[0], LOW);
digitalWrite(motor_left[1], HIGH);
digitalWrite(motor_right[0], HIGH);
digitalWrite(motor_right[1], LOW);
}
void turn_right(){
digitalWrite(motor_left[0], HIGH);
digitalWrite(motor_left[1], LOW);
digitalWrite(motor_right[0], LOW);
digitalWrite(motor_right[1], HIGH);
}
During the last months I´ve been working with Rui Horta and Micro Audio Waves on a show called Zoetrope.
My main task was to produce visual animations and motion graphics to be projected on 5 screens.
If you want to see the final result of an extensive team work join us at TeCa during the days 8, 9 and 10 of January, you can see more dates here.
concepção cénica, direcção artística, desenho de luz, multimédia Rui Horta música original Micro Audio Waves realização e edição vídeo Edgar Alberto motion graphics Guilherme Martins programação multimédia Rui Madeira figurinos Ricardo Preto interpretação Micro Audio Waves (Cláudia Efe, C.Morg, Flak) + Francisco Rebelo produção executiva Lado B co-produção Culturgest, O Espaço do Tempo, Laboral Escena, Teatro Virgínia, TNSJ duração aproximada 1:10 classificação etária Para Maiores de 3 anos
***************************************
Samples of my work:
Esta tradução foi feita com o consentimento do seu autor.
O artigo original encontra-se aqui.
Todas e quaisquer questões relativamente ao seu conteúdo deverão ser discutidas no forum LMR (se possivel em inglês) .
Todas e quaisquer questões relativas à tradução para português por favor comuniquem ao tradutor (eu) .
——————————————————————————-
Este projecto não requere conhecimento de electrónica, e não está no âmbito deste projecto aprofundar muito neste sentido, apenas vai fazer com que dês o primeiro passo na construção de um robot muito rapidamente. É baseado num sistema chamado Picaxe que apesar de ser muito simples é também bastante poderoso. Se quizeres experimentar outra plataforma igualmente simples e robusta existe o Arduino. Tens aqui um projecto simples que usa um Arduino e uma breadboard para construir um simples perseguidor de luz.